Making trousers
Have you made trousers before?
I wanted to for the longest time but was intimidated by the thought of making fit adjustments. It felt like a whole other level of sewing skills would be required. So.. I put it off and kept letting it slip down my to-make list until the Sew Fancy Pants challenge hosted by Nicole, Loni, Katie and Jennifer in January gave me the push I needed.
And the result? I have now dubbed 2019 #theyearofpants! It is so satisfying to ovecome a challenge. And to be honest, it was mostly a mental challenge. Making pants is nowhere near as intimidating as I had thought!


Sew along time
If you’re where I was at the beggining of the year and you want to try your hand at making trousers… Or if you’ve made plenty of pants but want a sewing buddy to make some up – this is the post for you!!
Starting this Friday I am hosting a sew along for the awesome Flint Pants (and shorts) by Megan Nielsen!
These pants are the perfect introduction to for a begginer as they have no zip or fly construction to fuss with. Instead, they have a super cool hidden closure in the pocket. All you need to get sewing is your fabric, some interfacing and one or two buttons!
I pulled together some inspiration for making a multutde of different looks with this pattern here. You’ll also want to follow that link to get your exclusive 20% discount code on the pattern!! It’s only valid until the end of the sew along so head over there now!
Knowing your size
If you have your pattern, you’re going to want to source your fabric. In order to know how much you need, you’ll have to work out your size. So today I want to chat about how to do that!

Measure measure measure
The first thing you need to do is re-measure you waist and hip measurements. Yes, you’ve probably taken these measurements before but it’s always risky using potentially out of date info! If you’re going to spend the time, effort and precious fabric… I’m just saying it’s worth the extra step!
Check your waist and hip measurements against the body measurements as well as the finished garment measurements to decide where you fall closest too. You can find these in the pattern instructions but also on the product listing itself.
When you compare the body and garment measurements you’ll see that there is quite a bit of ease at the hips but none at the waist. So I would base my size for this pattern on my waist measurement.
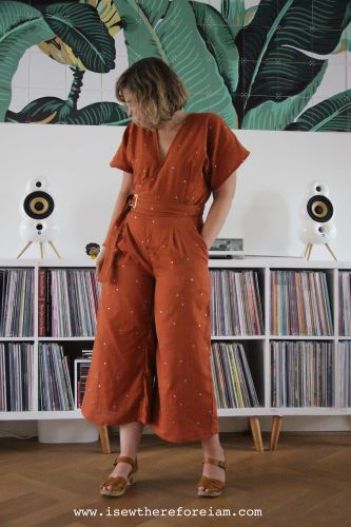
The great thing about the ties and buttons on the waistband is that they can give you a little wriggle room when it comes to fitting. Beck, from I sew therefore I am, has made at least three pairs of Flints and had the fabulous tip to sew a couple of extra button holes on the inside waistband to allow for those days when you just want a bit more space!
Check out her jumpsuit hack below!!
No box will contain me!
Patterns are drafted off a particular block so they will very rarely match you exactly.
I would always advise making a muslin if you have the time and energy. That way you can make you’re best guess at your size via the measurements, see how it sews and make any necessary adjustments before using your precious fabric! That said, I’m a recovering impatient sewist so I don’t always take my own advice in this regard!
My waist measures at 82cm and my hip at 103. This places my waist just above a size 14 and my hip just above a size 12. I wanted my Flints to be lovely loose fitting summer shorts so I wasn’t worried about the hip masurement but since there was no ease at the waist I decided to grade between a size 16 at the waist to a size 14 at the hip.
Grading sizes
Grading between sizes in this case is actually fairly straight forward. I drew a line from the top of the waistline, half way between the size 14 and 16 and tapered it down to the size 14 line at the first notch. I did this on both sides of the front and back pattern pieces at the waist line.

I then lay the size 14 waistband pattern piece over the size 16 waistband, lining them up at the right side seam notch and marked a line halfway between the two pattern pieces.

The last step was to transfer the markings for the button holes and buttons onto the patten piece at the correct distance from the new pattern edge.

So now you know how to work out your size, my next post will be all about selecting the right fabric and my tips for working out just how much you need.
Drop any questions you may have in the comments below and let me know if you’ll be joining in on the fun come Friday!
If you haven’t already, sign up to my newsletter so you don’t miss any of the tips and tutorials coming this way soon!
